

How To Apply Textures In Maya
Now that you've output all the UV meshes, you can import them into an external image editor to create a texture.
Once you've created associated texture files, you can apply them to your model. For the purposes of this tutorial, textures have been provided for you in the sourceimages folder.
To apply the texture for the torso
- In the perspective view,
 -click the torso and select from the pop-up menu.
 The window appears.
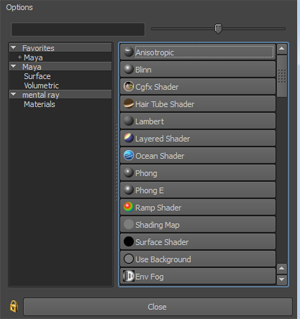
- Select .
The soldier's torso turns matte grey.
- Open the and select the lambert tab.
- Change the name of the lambert material to Mat_Torso.
- Click the box next to .
The window appears.
- Click .
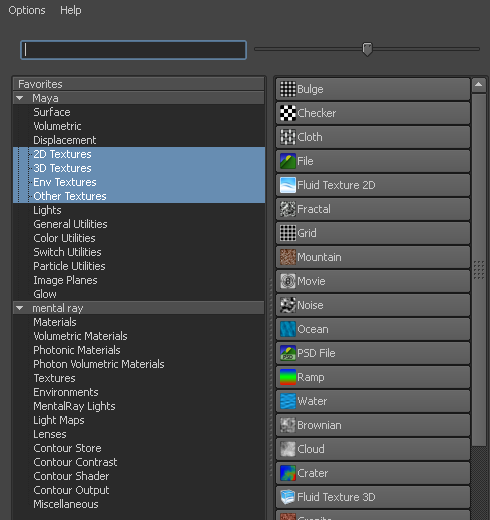
- In the , click the folder icon next to the field.
A file browser appears.
- Navigate to the GettingStarted2014LessonData\UVMapping\sourceimages folder, select soldier_torso.tif, then click .
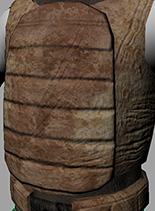
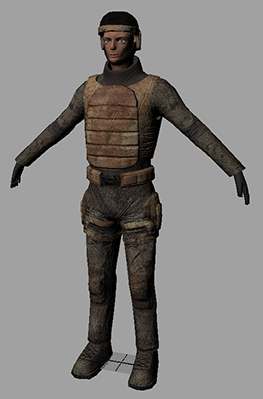
The body armor texture is applied to the soldier's body. If the texture does not appear in the scene, press 6.
- Select all the UVs and click the icon (
 ). Slowly unfold the UVs until they roughly match the details of the texture as shown below.
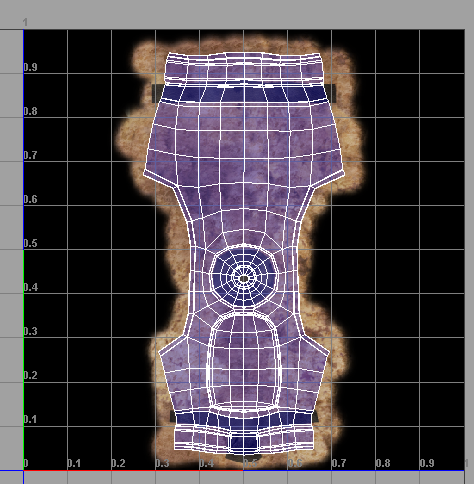
If the texture is not aligned or sized correctly you can adjust the UVs in the using the .
-
 -click the torso and select from the marking menu.
 - Select the torso in the perspective view.
- In the , navigate to the Mat_Torso tab,
- Click the box next to .
The window appears.
- Click .
A file tab appears in the .
- In the file tab, click the browse icon next to .
A file browser appears.
- Navigate to the GettingStarted2014LessonData\UVMapping\sourceimages folder, select soldier_torso_normals.tif, and click .
Normal maps appear on the soldier's chest. Normal maps give the flat portions of the texture the illusion of 3D bumps.
NoteYou may need to perform a render of the scene view or switch to or to visualize the normal maps.
Now you can repeat the process for the other body parts by applying the following textures:
| Appendage | Material node name | Texture filename | Normals filename |
|---|---|---|---|
| Left Arm | Mat_Arm | soldier_arm.tif | soldier_arm_normals.tif |
| Right Arm | Mat_Arm (reuse from above by using Assign Existing Material). | soldier_arm.tif | soldier_arm_normals.tif |
| Legs | Mat_Legs | soldier_legs.tif | soldier_legs_normals.tif |
| Left Foot | Mat_Feet | soldier_boot.tif | soldier_boot_normals.tif |
| Right Foot | Mat_Feet (reuse from above by using Assign Existing Material). | soldier_boot.tif | soldier_boot_normals.tif |
| Head | Mat_Head | soldier_head.tif | soldier_head_normals.tif |
| Eye | Mat_Eye | soldier_eye.tif | none |
Note
When reusing a texture for a mirrored appendage (Right Arm or Right Foot), you must flip the UVs in the to fit the texture. You can do this by selecting all the UVs and clicking the button ( ) in the .

How To Apply Textures In Maya
Source: https://download.autodesk.com/us/maya/Maya_2014_GettingStarted/files/GUID-B6CD584E-6EDC-4463-895B-71674538484F.htm
Posted by: waltersrehe1947.blogspot.com
0 Response to "How To Apply Textures In Maya"
Post a Comment